Canvas Draw Circle With Mouse

Have questions? Discuss this HTML5 / Canvas tutorial with others on the forums.
When drawing in the canvas, a (very superior) shape you will often want to draw is a circle:

While the circle seems like something that would be like shooting fish in a barrel to depict, as y'all will see shortly, it has some baroque behaviors that y'all need to know about. This tutorial will help you lot out with that and more than.
Let'due south go started!
Meet the Arc Function
The fashion you depict a circumvolve in your canvas past using the handy arc function. This function and the arguments you demand to specify in lodge to use information technology look equally follows:
arc(centerX, centerY, radius, startAngle, endAngle, isAntiClockwise);
These arguments are important in helping you depict the circle that you lot want, so let'southward look in particular what all of these arguments do.
centerX and centerY
The centerX and centerY arguments are pretty straightforward to understand. They specify where the middle of your circle volition be positioned within the sheet:

Remember, the sail lives in an inverted Cartesian arrangement. What this means is that the x value increases as you motion right, and the y value increases as you lot go down. This might exist a lilliputian different than what you may remember from graphing equations in school.
Radius
The radius specifies the directly line distance of your circle from its center to any border:

The larger your radius, the bigger your circle will be. The smaller your radius, the smaller your circle will be. If you provide a negative value, JavaScript will throw a nice IndexSizeError exception, so you don't desire to do that.
startAngle, endAngle, and isAntiClockwise
Now, we finally get to the interesting stuff. These three arguments are interesting and closely related to drawing your circle. As you probably know, a circle is made upward of 360 degrees:

There are two important details to annotation - details that volition probably shatter your belief in all that is good in this world. The first is that the angles increase clockwise for a circumvolve when fatigued in the canvas:
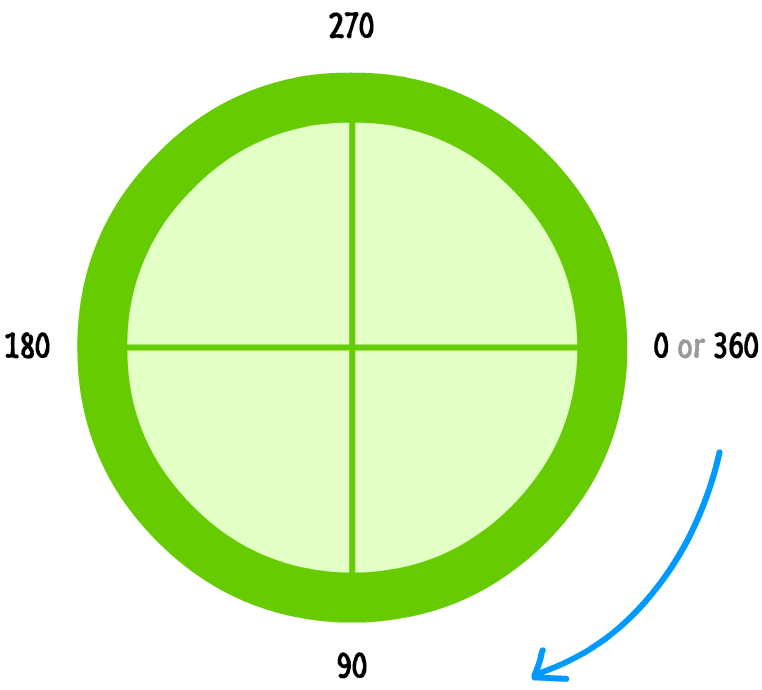
The second detail is that JavaScript doesn't work with degrees. In JavaScript land, you deal with everything in terms of radians:

In one case yous sympathise these two details, yous crossed a big hurdle in mentally existence able to visualize what your arc function volition create.
Note: Converting from Degrees to Radians
To convert from degrees to radians, simply utilise the following expression: var radians = (Math.PI / 180) * degrees.
Ok, let's now take a step frontward and work through how the startAngle, stopAngle, and isAntiClockwise arguments play a role. At that place are three steps you need to follow:
- Mark your startAngle.
- Marking your stopAngle.
- Draw a line on the circumference either clockwise or anticlockwise depending on whether your value for isAntiClockwise is true or simulated.
- If y'all are filling in your circle, make full in the region enclosed by the circumference and the direct line betwixt the points referenced past startAngle and stopAngle.
Let's look through an example of this. Allow's say your start angle is ᴨ / two, and your end angle is ᴨ. You are besides anticlockwise and centered at 200, 200 with a radius of 93.
Given those values, the arc part would await as follows:
arc(200, 200, 93, Math.PI / 2, Math.PI, true);
If you had to visualize this, here is what your circle with merely the stroke divers would look like:

If y'all filled in this circumvolve, here is what you would see:

Detect that your circle'southward starting time and end points are defined by your startAngle (ᴨ / ii) and your endAngle (ᴨ). Because you lot are going anti-clockwise, notice that the outline and the colored region goes all the way effectually the circle on the long side.
If you switch from being anticlockwise to being clockwise but keep all of your other values the same, your arc function now looks as follows:
arc(200, 200, 93, Math.PI / 2, Math.PI, false);
As a result of the management beingness changed, your circle takes a different plough (ha!):

Whenever yous run into the arc part and demand to visualize what the final circle looks similar, use the iv steps I described earlier. Those steps hold for whatever combination of startAngle, endAngle, and true/imitation you provide for the anti-clockwiseness of your circumvolve.
Displaying the Circle
Ok, now that yous know all about the arc function and how you can mentally depict your circle, it'southward time to draw it for realz. Let's say that that you have some starting code that looks as follows:
var mainCanvas = document.getElementById("myCanvas"); var mainContext = mainCanvas.getContext("2nd"); var canvasWidth = mainCanvas.width; var canvasHeight = mainCanvas.elevation; function draw() { } draw(); This code just takes care of only getting your sheet (whose id value is myCanvas) prepped for drawing content. In that location is nix fancy going on hither, so let's ready that. Modify your draw function by calculation the following lawmaking:
function draw() { // draw the colored region mainContext.beginPath(); mainContext.arc(200, 200, 93, Math.PI / 2, Math.PI, true); mainContext.fillStyle = '#FF6A6A'; mainContext.fill(); // draw the stroke mainContext.lineWidth = 20; mainContext.strokeStyle = '#FF0000'; mainContext.stroke(); } If you preview in your browser right at present, you lot volition run across something that looks as follows:

We've already seen this weird semi-circle in the previous section, it is squeamish to see it existence drawn from actual lawmaking as opposed to just plain English language words. Before we wrap things up, let's end (ironically) past looking at the lawmaking for how to draw a full circle:
part draw() { // describe the colored region mainContext.beginPath(); mainContext.arc(200, 200, 93, 0, 2 * Math.PI, true); mainContext.fillStyle = "#E2FFC6"; mainContext.fill up(); // draw the stroke mainContext.lineWidth = twenty; mainContext.strokeStyle = "#66CC01"; mainContext.stroke(); } When you preview this in your browser, you lot'll see something that looks like this:

You tin tell by looking at the arguments we passed in to the arc method for why that is. The startAngle value is 0, and the endAngle value is 2ᴨ. We don't go out whatsoever room for any spoiled radians to go off and do something crazy.
Conclusion
Well, that's all there is to drawing circles on the sheet. Equally you've seen past now, there is no simple circumvolve method that draws a circle for you. Instead, you have the more general arc method that provides you with a lot of fiddling buttons to button and to customize what your circle looks like. With generality, yous frequently get complexity. Where in that location is complexity, y'all'll probably discover me writing about information technology. Now, isn't that the nearly blench-worthy conclusion you've probably always read? I certainly hope so :P
Got a question or just desire to conversation? Comment beneath or drop by our forums (they are actually the aforementioned thing!) where a bunch of the friendliest people yous'll always run into volition exist happy to help y'all out!

![]()
When Kirupa isn't busy writing well-nigh himself in 3rd person, he is practicing social distancing…even on his Twitter, Facebook, and LinkedIn profiles.
Hit Subscribe to get absurd tips, tricks, selfies, and more personally manus-delivered to your inbox.
Source: https://www.kirupa.com/html5/drawing_circles_canvas.htm
0 Response to "Canvas Draw Circle With Mouse"
Post a Comment